Latest Post

Proximatemplate blogspot miễn phí có thể sử dụng cho nhiều chủ đề khác nhau. Proxima có thiết kế thân thiện, hoàn toàn responsive tương thích với tất cả các loại màn hình. Các hiệu ứng hình ảnh khá chuyên nghiệp.

Template Proxima cho Blogspot
Proxima blogger template là một sự lựa chọn lý tưởng cho các trang web về game, công thức nấu ăn, tin tức, review, nghệ thuật và nhiếp ảnh.

Thông tin khác về template Proxima cho Blogspot:

  • Thiết kế phong cách Gallery và Danh mục
  • Tự động lấy ảnh làm ảnh đại diện cho bài việt
  • Giao diện 2 cột
  • Thanh menu xổ xuống
  • Bài viết mới nhất với slider dạng zoom ảnh
  • Vị trí đặt banner quảng cáo có sẵn
  • Tối ưu hóa công cụ tìm kiếm
  • Giao diện hoàn toàn responsive
  • Thông tin tác giả 
  • Sidebar bên phải
  • Footer 3 cột
  • Có News Ticker
  • Bài viết liên quan
  • Hệ thống bình luận Blogger
  • Tương thích với các trình duyệt phổ biến
  • Button theo dõi và các icon chia sẻ lên mạng xã hội 
  • Thanh điều hướng trang
  • Hộp tìm kiếm
  • Bài viết phổ biến, Nhãn và Lưu trữ bên thanh Sidebar!
  • Trang lỗi 404 tùy chỉnh

Đây là hướng dẫn tạo sitemap cho Blogspot nhằm cung cấp cho các công cụ tìm kiếm sơ đồ trang blog của bạn, nó sẽ giúp điều hướng bots và hỗ trợ SEO Blogspot tốt hơn. Ngoài ra, với sitemap này, đây có thể nói là một trang điều hướng cho các bài viết của bạn, nó sẽ hiển thị theo label, tên đầy đủ các bài viết trong từng label, giao diện khá đẹp nhé ^^

Tạo sitemap cho Blogspot - SEO Blogger
Với sitemap cho Blogspot này, mọi thứ đều hoàn toàn tự động, mỗi bài viết sau khi được public lên sẽ tự được thêm vào để cung cấp thông tin cho các bọ tìm kiếm!

Làm sao để tạo sitemap cho Blogspot?

- Truy cập vào trang quản trị Blogger
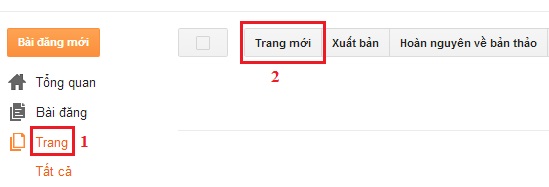
- Chọn Trang, tiếp tục tạo Trang mới
Tạo trang cho Blogspot

- Xuất hiện khu vực như khu vực viết bài mới của chúng ta, hãy thêm đoạn code này vào phần nội dung (Nhớ là tab HTML nhé):
<style>
p.labels a{color: #242424; text-transform: uppercase;font-size: 15px;}
a.post-titles {color: #0000FF;}
ol li{list-style-type:decimal;line-height:25px;}
</style>
<script>
//<![CDATA[
var postTitle=new Array();var postUrl=new Array();var postPublished=new Array();var postDate=new Array();var postLabels=new Array();var postRecent=new Array();var sortBy="titleasc";var tocLoaded=false;var numChars=250;var postFilter="";var numberfeed=0;function bloggersitemap(a){function b(){if("entry" in a.feed){var d=a.feed.entry.length;numberfeed=d;ii=0;for(var h=0;h<d;h++){var n=a.feed.entry[h];var e=n.title.$t;var m=n.published.$t.substring(0,10);var j;for(var g=0;g<n.link.length;g++){if(n.link[g].rel=="alternate"){j=n.link[g].href;break}}var o="";for(var g=0;g<n.link.length;g++){if(n.link[g].rel=="enclosure"){o=n.link[g].href;break}}var c="";if("category" in n){for(var g=0;g<n.category.length;g++){c=n.category[g].term;var f=c.lastIndexOf(";");if(f!=-1){c=c.substring(0,f)}postLabels[ii]=c;postTitle[ii]=e;postDate[ii]=m;postUrl[ii]=j;postPublished[ii]=o;if(h<10){postRecent[ii]=true}else{postRecent[ii]=false}ii=ii+1}}}}}b();sortBy="titleasc";sortPosts(sortBy);sortlabel();tocLoaded=true;displayToc2();document.write('</br>')}function filterPosts(a){scroll(0,0);postFilter=a;displayToc(postFilter)}function allPosts(){sortlabel();postFilter="";displayToc(postFilter)}function sortPosts(d){function c(e,g){var f=postTitle[e];postTitle[e]=postTitle[g];postTitle[g]=f;var f=postDate[e];postDate[e]=postDate[g];postDate[g]=f;var f=postUrl[e];postUrl[e]=postUrl[g];postUrl[g]=f;var f=postLabels[e];postLabels[e]=postLabels[g];postLabels[g]=f;var f=postPublished[e];postPublished[e]=postPublished[g];postPublished[g]=f;var f=postRecent[e];postRecent[e]=postRecent[g];postRecent[g]=f}for(var b=0;b<postTitle.length-1;b++){for(var a=b+1;a<postTitle.length;a++){if(d=="titleasc"){if(postTitle[b]>postTitle[a]){c(b,a)}}if(d=="titledesc"){if(postTitle[b]<postTitle[a]){c(b,a)}}if(d=="dateoldest"){if(postDate[b]>postDate[a]){c(b,a)}}if(d=="datenewest"){if(postDate[b]<postDate[a]){c(b,a)}}if(d=="orderlabel"){if(postLabels[b]>postLabels[a]){c(b,a)}}}}}function sortlabel(){sortBy="orderlabel";sortPosts(sortBy);var a=0;var b=0;while(b<postTitle.length){temp1=postLabels[b];firsti=a;do{a=a+1}while(postLabels[a]==temp1);b=a;sortPosts2(firsti,a);if(b>postTitle.length){break}}}function sortPosts2(d,c){function e(f,h){var g=postTitle[f];postTitle[f]=postTitle[h];postTitle[h]=g;var g=postDate[f];postDate[f]=postDate[h];postDate[h]=g;var g=postUrl[f];postUrl[f]=postUrl[h];postUrl[h]=g;var g=postLabels[f];postLabels[f]=postLabels[h];postLabels[h]=g;var g=postPublished[f];postPublished[f]=postPublished[h];postPublished[h]=g;var g=postRecent[f];postRecent[f]=postRecent[h];postRecent[h]=g}for(var b=d;b<c-1;b++){for(var a=b+1;a<c;a++){if(postTitle[b]>postTitle[a]){e(b,a)}}}}function displayToc(a){var l=0;var h="";var e="Post Title";var m="Click to sort by title";var d="Date";var k="Click to sort by date";var c="Category";var j="";if(sortBy=="titleasc"){m+=" (descending)";k+=" (newest first)"}if(sortBy=="titledesc"){m+=" (ascending)";k+=" (newest first)"}if(sortBy=="dateoldest"){m+=" (ascending)";k+=" (newest first)"}if(sortBy=="datenewest"){m+=" (ascending)";k+=" (oldest first)"}if(postFilter!=""){j="Click to view all"}h+="<table>";h+="
<tr>";h+='<td class="header1">';h+='<a href="javascript:toggleTitleSort();" title="'+m+'">'+e+"</a>";h+="</td>";h+='<td class="header2">';h+='<a href="javascript:toggleDateSort();" title="'+k+'">'+d+"</a>";h+="</td>";h+='<td class="header3">';h+='<a href="javascript:allPosts();" title="'+j+'">'+c+"</a>";h+="</td>";h+='<td class="header4">';h+="Read all";h+="</td>";h+="</tr>
";for(var g=0;g<postTitle.length;g++){if(a==""){h+='
<tr><td class="entry1"><a href="'+postUrl[g]+'">'+postTitle[g]+'</a></td><td class="entry2">'+postDate[g]+'</td><td class="entry3">'+postLabels[g]+'</td><td class="entry4"><a href="'+postPublished[g]+'">Read</a></td></tr>
';l++}else{z=postLabels[g].lastIndexOf(a);if(z!=-1){h+='
<tr><td class="entry1"><a href="'+postUrl[g]+'">'+postTitle[g]+'</a></td><td class="entry2">'+postDate[g]+'</td><td class="entry3">'+postLabels[g]+'</td><td class="entry4"><a href="'+postPublished[g]+'">Read</a></td></tr>
';l++}}}h+="</table>
";if(l==postTitle.length){var f='<span class="toc-note">Show All '+postTitle.length+" Posts<br/></span>"}else{var f='<span class="toc-note">Show '+l+" posts by category '";f+=postFilter+"' the "+postTitle.length+" Total Posts<br/></span>"}var b=document.getElementById("toc");b.innerHTML=f+h}function displayToc2(){var a=0;var b=0;while(b<postTitle.length){temp1=postLabels[b];document.write("<p/>");document.write('<p class="labels">
<a href="/search/label/'+temp1+'">'+temp1+"</a></p>
<ol>");firsti=a;do{document.write("
<li>");document.write('<a class="post-titles" href="'+postUrl[a]+'">'+postTitle[a]+"</a>");if(postRecent[a]==true){document.write(' - <strong><span style="color: rgb(255, 0, 0);">New!</span></strong>')}document.write("</li>
");a=a+1}while(postLabels[a]==temp1);b=a;document.write("</ol>
");sortPosts2(firsti,a);if(b>postTitle.length){break}}}function toggleTitleSort(){if(sortBy=="titleasc"){sortBy="titledesc"}else{sortBy="titleasc"}sortPosts(sortBy);displayToc(postFilter)}function toggleDateSort(){if(sortBy=="datenewest"){sortBy="dateoldest"}else{sortBy="datenewest"}sortPosts(sortBy);displayToc(postFilter)}function showToc(){if(tocLoaded){displayToc(postFilter);var a=document.getElementById("toclink")}else{alert("Just wait... TOC is loading")}}function hideToc(){var a=document.getElementById("toc");a.innerHTML="";var b=document.getElementById("toclink");b.innerHTML='<a href="#" onclick="scroll(0,0); showToc(); Effect.toggle(\'toc-result\',\'blind\');">?? Display Table of Contents</a> <img src="https://blogger.googleusercontent.com/img/b/R29vZ2xl/AVvXsEg_YqoAnW8EHm5ljH-UF_qnXeipunyEhmWZSFalbYi7_YYCyNa35YhBkpAZXu25LbGcgEVK1WnGlrJnTAQae5d3MIHMpRoeb7IvOcMdgfyqc5DeqVuzzhQlNmplnHSO92NXF0xUCjlN3PyI/s1600/new_icon.gif"/>'}function looptemp2(){for(var a=0;a<numberfeed;a++){document.write("<br>");document.write('Post Link : <a href="'+postUrl[a]+'">'+postTitle[a]+"</a><br>");document.write('Read all : <a href="'+postPublished[a]+'">'+postTitle[a]+"</a><br>");document.write("<br>")}};
//]]>
</script>
<script src="http://templateblogvn.blogspot.com/feeds/posts/default?max-results=9999&amp;alt=json-in-script&amp;callback=bloggersitemap"></script>
Thay đường dẫn màu xanh bằng đường dẫn blog của bạn nhé!

   Chú ý: Phần tiêu đề, đây chính là đường dẫn đến sitemap của chúng ta, ví dụ, nếu mình ghi chổ đó là sitemap, thì sau khi public trang này ra thì nó sẽ có dạng: blogspot.com/p/sitemap.html.

- Nhìn vào thanh sidebar bên phải phần viết bài, click vào Tùy chọn, phần nhận xét của người đọc, tick vào Không cho phép, ẩn liên kết hiện có nhé.
- Sau khi hoàn thành các bước trên thì bấm vào Xuất bản nhé.

Vậy là bạn đã hoàn thành, và có 1 trang sitemap cho blogspot khá đẹp, nó sẽ nằm ở đường dẫn:
http://domaincuaban/p/sitemap.html

Bạn có thể sử dụng sitemap này để submit với Google nhằm cung cấp sơ đồ trang cho googlebot có thể tìm kiếm đến các khu vực trên website của bạn.

Chắc hẳn bất kỳ ai làm SEO cũng đã từng nghe đến breadcrumbs, và nó là một trong những yếu tố giúp bạn tối ưu SEO Blogspot tốt hơn. Nhưng quan trọng là làm thế nào để tạo breadcrumbs, cụ thể ở đây là tạo breadcrumbs cho Blogspot.

Breadcrumbs là gì? Cách tạo Breadcrumbs cho Blogspot

Breadcrumbs là gì?

- Breadcrumbs là một tập hợp các liên kết mô tả đường dẫn của một trang web trên kết quả tìm kiếm của Google và nó là những đường dẫn phân cấp xuất hiện trong website của bạn giúp bạn biết mình đang ở trang nào, và giúp dễ dàng di chuyển giữa các trang, bạn có thể xem ví dụ dưới đây:

Breadcrumbs

Bạn có thể thấy, bài viết của mình nằm trong các label như Naruto Coming, Ninja Coming, Game...

Còn đây là một kết quả tìm kiếm không có breadcrumbs, tức đường dẫn trả về ở kết quả tìm kiếm chỉ là đường dẫn của bài viết mà thôi:
Không Breadcrumbs

- Ngoài tác dụng giúp người xem dễ dàng di chuyển đến các trang khác thì breadcrumbs còn giúp làm đẹp đường dẫn website của bạn trên kết quả tìm kiếm.

Làm thế nào để thêm breadcumbs vào Blogspot?

- Hãy truy cập vào trang quản trị của Blogger, vào Edit HTML (Chỉnh sửa HTML) trong phần Template (Mẫu)
- Click vào vùng code, bấm Ctrl+F để mở hộp tìm kiếm, và tìm kiếm đến đoạn code này:
<b:includable id='post' var='post'>
- Sau đó hãy thay toàn bộ đoạn code đó bằng đoạn code dưới đây:
<b:includable id='post' var='post'>
<b:if cond='data:blog.pageType == &quot;item&quot;'>
<div itemscope='' itemtype='http://data-vocabulary.org/Breadcrumb'><!--
Breadcrumbs microdata markup START. -->
<div class='swtBreadCrumbs'>
<a expr:href='data:blog.homepageUrl' itemprop='url' title='Home'>
<span itemprop='title'>Home</span></a>&#187;
<b:if cond='data:post.labels'>
<b:loop values='data:post.labels' var='label'>
<span typeof='v:breadcrumb'>
<a expr:href='data:label.url' itemprop='url' title='Categories' property='v:title' rel='v:url'>
<span itemprop='title'><data:label.name/></span>
</a>
</span>
<b:if cond='data:label.isLast != &quot;true&quot;'>|
</b:if>
</b:loop>
</b:if>
&#187;
<a expr:href='data:post.url' itemprop='url' title='Post Title'>
<span itemprop='title'>
<data:post.title/>
</span>
</a>
</div>
</div>
</b:if><!--
Breadcrumbs microdata markup END. -->
- Tiếp tục tìm đến thẻ ]]</b:skin> và thêm đoạn CSS này vào bên trên nó:
/*
Blogger Breadcrumbs
--------------------------------------------------*/
.swtBreadCrumbs:before { content:"You are here:";font-size: 85%;letter-spacing: 2px;}
.swtBreadCrumbs{width:auto;padding:0 0 5px 0;margin:0 5px;font-size:95%;border:2px solid #EDE;-webkit-border-top-left-radius: 10px;-webkit-border-top-right-radius: 10px;-moz-border-radius-topleft: 10px;-moz-border-radius-topright: 10px;border-top-left-radius: 10px;border-top-right-radius: 10px;padding: 5px;text-align: left;color:#000;background:#C3B9A8;background:-webkit-linear-gradient(top,#C3B9A8,#F3F1E6);background:-moz-linear-gradient(top,#C3B9A8,#F3F1E6);background:-ms-linear-gradient(top,#C3B9A8,#F3F1E6);background:-o-linear-gradient(top,#C3B9A8,#F3F1E6);background:linear-gradient(top,#C3B9A8,#F3F1E6);line-height:22px}
- Cuối cùng là lưu template lại.

Sau khi lưu lại xong, trang web của bạn đã có breadcrumbs dễ nhìn, điều hướng trang tốt và thuận tiện cho người xem và cả những người tìm kiếm trên Google.

Charmtemplate blogspot miễn phí đẹp và tối giản. Đây là một template cho blogspot với thiết kế 2 cộtvà hoàn toàn responsive. Charm là template phù hợp nhất cho blog cá nhân.
Template Charm cho Blogspot

Template Charm có nhiều widget đã được xây dựng sẵn cho sidebar và footer để giới thiệu nội dung.
Thông tin khác về Template Charm cho Blogspot:
  • Đẹp và giao diện tối giản
  • Thiết kế responsive hoàn toàn
  • Thích hợp cho các blog cá nhân
  • Bài viết mới nhất trên thanh sidebar
  • Giao diện 2 cột
  • Hộp tìm kiếm
  • Footer 3 cột
  • Tối ưu hóa công cụ tìm kiếm
  • Thông tin về tác giả trên thanh sidebar
  • Bài viết liên quan
  • Tương thích với các trình duyệt được phổ biến
  • Các button chia sẻ mạng xã hội
  • Khu vực đặt quảng cáo có sẵn
  • Thông tin tác giả dưới mỗi bài viết
  • Thanh menu xổ xuống responsive
  • Widget Instagram ở sidebar
  • Hệ thống bình luận G+
  • Màu chủ đạo: Màu xám, vàng và trắng

Đây là hướng dẫn hiển thị ngày tháng của bài viết được chia sẻ ngay bên thumbnails của bài viết đó trong Blogspot. Mục đích nhằm làm đẹp cho blog và cung cấp cho độc giả thông tin trực tiếp về thời gian bài viết này được chia sẻ.

Cách thêm ngày tháng bên cạnh bài viết Blogspot
Chú ý: Kết quả làm ra không đẹp như cái ảnh demo kia đâu nha :)) Muốn được như thế thì còn chỉnh nhiều lắm ^_^

Làm thế nào thêm ngày tháng vào cạnh bài viết Blogspot?

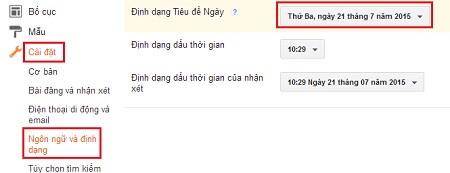
- Truy cập trang quản trị của Blogspot, vào Settings (Cài đặt), tiếp tục chọn Language and Formatting (Ngôn ngữ và định dạng), chỉnh định dạng ngày tháng bạn thấy thích hợp nhất.

Cách thêm ngày tháng bên cạnh bài viết Blogspot

- Tiếp tục vào Template (Mẫu), chọn Edit HTML (Chỉnh sửa HTML):

- Click vào vùng code, bấm Ctrl+F để mở hộp tìm kiếm, tìm đến đoạn code này:
<h2 class='date-header'><span><data:post.dateHeader/></span></h2>
- Nếu bạn tìm thấy có 2 đoạn code này, hãy thay thế cả 2 bằng đoạn code này:
<div id='Date'>
<script>changeDate(&#39;<data:post.dateHeader/>&#39;);</script>
</div>
<b:else/>
<div id='Date'>
<script>changeDate(&#39;&#39;);</script>
</div> 

- Tiếp tục tìm kiếm đến thẻ </head> này, và thêm đoạn code này vào bên trên nó:
 <script type='text/javascript'>
//<![CDATA[
var DateCalendar;
function changeDate(d){
if (d == "") {
d = DateCalendar;
}
var da = d.split(' ');
day = "<strong class='date_day'>"+da[0]+"</strong>";
month = "<strong class='date_month'>"+da[1].slice(0,3)+"</strong>";
year = "<strong class='date_year'>"+da[2]+"</strong>";
document.write(month+day+year);
DateCalendar = d;
}
//]]>
</script>
<b:if cond='data:blog.pageType != &quot;static_page&quot;'>
<style type='text/css'>
/* Calendar style date
----------------------------------------------- */
#Date {
background: transparent url(https://blogger.googleusercontent.com/img/b/R29vZ2xl/AVvXsEidcPNw_BZzepyaHdKzhPU03bPSPyexqTN_y_9Ei-K6xvca6R01D-LVMP_QE0MD4ocgtxpIo8kFV9eRw-_u7FNqArFPAJFZeLWnC39SdaB7-kCBZjBTQRL1iLtXnfmcDnphZ4L0JPKoACsj/s1600/calendar07.png) no-repeat;
display: block;
width:60px;
height:60px;
float: left;
margin: 15px 2px -40px -108px;
padding: 0 0 8px 0px;
border: 0;
text-transform: uppercase;
}
.date_month {
display: block;
font-size: 15px;
font-weight:bold;
margin-top:-1px;
text-align:center;
color:#ffffff; /* Month's color */
}
.date_day {
display: block;
font-size: 28px;
font-weight:bold;
margin-top:-8px;
text-align:center;
color:#282828; /* Day's color */
}
.date_year {
display: block;
font-size: 10px;
margin-top:-8px;
text-align:center;
color:#282828; /* Year's color */
}
</style>
</b:if>

Bạn có thể lưu lại rồi, tuy nhiên nếu muốn tùy chỉnh thêm thì có thể thay các vị trí ở dưới này theo ý của bạn:
Bạn có thể thay dạng hiển thị bằng cách thay link ảnh màu xanh ở trên bằng một ảnh khác. Nếu không hiển thị ngày tháng thì bạn có thể thay đổi số màu đỏ từ -108 đến 0.

Lưu lại, và thế là bạn đã có được thông tin về ngày tháng bên cạnh bài viết trong Blogspot rồi đó :D

Vibe Personal là một template blogspot miễn phí với thiết kế thanh lịch và cực kỳ đẹp. Vibe được thiết kế hoàn toàn responsive với bố cục 2 cột và thân thiện với các công cụ tìm kiếm. Vibe là template phù hợp nhất để làm blog cá nhân.

Template Vibe Personal cho blogspot
Một số thông tin khác về template Vibe cho Blogspot:
  • Thiết kế đẹp và thanh lịch
  • Hoàn toàn Responsive
  • Thích hợp cho blog cá nhân
  • Bài viết mới nhất ở sidebar
  • Giao diện 2 cột
  • Slider ảnh nền tự động
  • Slider bài viết tại trang chủ
  • Hộp tìm kiếm
  • Tối ưu hóa công cụ tìm kiếm
  • Thông tin về tác giả nằm ở sidebar
  • Bài viết liên quan và có slider
  • Tương thích với các trình duyệt phổ biến
  • Các vị trí quảng cáo có sẵn
  • Thanh menu responsive xổ xuống
  • Màu chủ đạo: Trắng

Với widget bài viết ngẫu nhiên (Random post), sẽ giúp tăng tỉ lệ giúp người xem đến 1 liên kết khác trong blogspot của bạn, đồng nghĩa là tăng lượt view, thời gian view và giảm tỉ lệ thoát cho web của bạn. Chỉ cần bạn đặt widget bài viết ngẫu nhiên này ở thanh siderbar của mình, nếu một độc giả thấy được đúng nội dung họ quan tâm, thì click thôi! :) Nó thật hữu ích! ^_^

widget bài viết ngẫu nhiên (Random post)

Vậy làm thế nào để tạo widget bài viết ngẫu nhiên?

- Đầu tiên hãy vào trang quản trị tại blogger.com
- Tiếp tục chọn vào Bố cục (Layout), chọn thêm tiện ích trên thanh sidebar của bạn, và chọn HTML/JavaScript nhé.
- Thêm đoạn code này vào phần nội dung và lưu lại:
<style>
#random-posts img {
    border-radius: 1000px;
    borde:5px solid;
    color:#dddddd;
    float: left;
    margin-right: 5px;
    width: 75px;
    height: 75px;
    background-color: #F5F5F5;
    padding: 3px;
    transition: all 0.2s linear 0s;
}

#random-posts img:hover {
    opacity: 0.6;
}

ul#random-posts {
    list-style-type: none;
    padding: 0px;
}

#random-posts a {
    font-size: 12px;
    text-transform: uppercase;
    padding: 3px auto 5px;
}

#random-posts a:hover {
    text-decoration: none;
}

.random-summary {
    font-size: 11px;
    background: none;
    padding: 5px;
    margin-right: 8px;
}

#random-posts li {
    margin-bottom: 10px;
    border-bottom: 1px solid #EEEEEE;
    padding: 4px;
}
</style>
<ul id='random-posts'>
<script type='text/javaScript'>
var randomposts_number = 5;
var randomposts_chars = 110;
var randomposts_details = 'no';
var randomposts_comments = 'Comments';
var randomposts_commentsd = 'Comments Disabled';
var randomposts_current = [];
var total_randomposts = 0;
var randomposts_current = new Array(randomposts_number);

function randomposts(json) {
    total_randomposts = json.feed.openSearch$totalResults.$t
}
document.write('<script type=\"text/javascript\" src=\"/feeds/posts/default?alt=json-in-script&max-results=0&callback=randomposts\"><\/script>');

function getvalue() {
    for (var i = 0; i < randomposts_number; i++) {
        var found = false;
        var rndValue = get_random();
        for (var j = 0; j < randomposts_current.length; j++) {
            if (randomposts_current[j] == rndValue) {
                found = true;
                break
            }
        };
        if (found) {
            i--
        } else {
            randomposts_current[i] = rndValue
        }
    }
};

function get_random() {
    var ranNum = 1 + Math.round(Math.random() * (total_randomposts - 1));
    return ranNum
};
</script>
<script type='text/javaScript'>
function random_posts(json) {
    for (var i = 0; i < randomposts_number; i++) {
        var entry = json.feed.entry[i];
        var randompoststitle = entry.title.$t;
        if ('content' in entry) {
            var randompostsnippet = entry.content.$t
        } else {
            if ('summary' in entry) {
                var randompostsnippet = entry.summary.$t
            } else {
                var randompostsnippet = "";
            }
        };
        randompostsnippet = randompostsnippet.replace(/<[^>]*>/g, "");
        if (randompostsnippet.length < randomposts_chars) {
            var randomposts_snippet = randompostsnippet
        } else {
            randompostsnippet = randompostsnippet.substring(0, randomposts_chars);
            var whitespace = randompostsnippet.lastIndexOf(" ");
            randomposts_snippet = randompostsnippet.substring(0, whitespace) + "&#133;";
        };
        for (var j = 0; j < entry.link.length; j++) {
            if ('thr$total' in entry) {
                var randomposts_commentsnum = entry.thr$total.$t + ' ' + randomposts_comments
            } else {
                randomposts_commentsnum = randomposts_commentsd
            }; if (entry.link[j].rel == 'alternate') {
                var randompostsurl = entry.link[j].href;
                var randomposts_date = entry.published.$t;
                if ('media$thumbnail' in entry) {
                    var randompoststhumb = entry.media$thumbnail.url
                } else {
                    randompoststhumb = "https://blogger.googleusercontent.com/img/b/R29vZ2xl/AVvXsEgS0jOG4KByaxdCGBr_yuSj66o_yKQq_v_uKZmklIgT-pPKFLa3FrsxdXOHQR5q9ZwyuqWo1n2AnrveQqgzjueqMUmLyEb1E8eyvaaE0ASCqCVLloLj0_8eUDOOcwacL_e30wpLgNxTW4Y/s1600/no_thumb.png"
                }
            }
        };
        document.write('<li>');
        document.write('<a href="' + randompostsurl + '" rel="nofollow"><img alt="' + randompoststitle + '" src="' + randompoststhumb + '"/></a>');
        document.write('<div><a href="' + randompostsurl + '" rel="nofollow">' + randompoststitle + '</a></div>');
        if (randomposts_details == 'yes') {
            document.write('<span><div  class="random-info">' + randomposts_date.substring(8, 10) + '.' + randomposts_date.substring(5, 7) + '.' + randomposts_date.substring(0, 4) + ' - ' + randomposts_commentsnum) + '</div></span>'
        };
        document.write('<br/><div class="random-summary">' + randomposts_snippet + '</div><div style="clear:both"></div></li>')
    }
};
getvalue();
for (var i = 0; i < randomposts_number; i++) {
    document.write('<script type=\"text/javascript\" src=\"/feeds/posts/default?alt=json-in-script&start-index=' + randomposts_current[i] + '&max-results=1&callback=random_posts\"><\/script>')
};
</script>
</ul>
- Sau khi lưu lại thì coi như bạn đã hoàn thành, đã có widget bài viết ngẫu nhiên cho blogspot của bạn!

Tuy nhiên, mặc định đoạn code này chỉ hiện title và hình ảnh của bài viết, chứ không có phần trích nội dung của bài viết, nếu bạn muốn có thêm phần trích nội dung thì tìm đến đoạn code này và thay no thành yes nhé:
var randomposts_details = 'no'; . 

Ngoài ra, bạn còn có thể tùy chỉnh số lượng bài viết hiển thị và số ký tự phần trích đoạn nội dung tại đoạn code này:
var randomposts_number = 5;
var randomposts_chars = 110;

Nếu bạn thấy bài viết ổn thì share cho mọi người nhé ^^

Microsoft gần đây đã tung ra đoạn video giới thiệu ứng dụng Hyperlapse, cho phép người dùng tạo ra những video được quay một cách trơn tru, mượt mà và có thể quay time-lapse bằng cách cầm tay nhờ các thuật toán xử lý hình ảnh của Microsoft. Hôm nay, Hyperlapse đã có một cập nhật cho các điện thoại Windows Phone. Bản cập nhật này sẽ cho phép nhiều thiết bị Lumia có thể tải về và sử dụng ứng dụng này.

Hyperlapse cho Windows Phone
Cụ thể, Hyperlapse có thể được sử dụng trên bất kỳ Lumia nào sử dụng bộ vi xử lý Qualcomm Snapdragon S4 và có ít nhất 512MB RAM. Tuy nhiên, điện thoại chỉ với 512MB không thể quay video HD; bạn sẽ cần một chiếc điện thoại với ít nhất 1GB RAM để có thể làm điều đó.

Bạn có thể xem qua tính năng của Hyperlapse ở video này:


Bạn có thể download Hyperlapse cho Windows Phone tại đây, hoặc quét mã QR này:

Mã QR Hyperlapse
Tham khảo: WindowsCentral

XPress News là một template chuẩn SEO cao cấp có thiết kế Responsive, là một template lý tưởng cho các tạp chí trực tuyến, báo, cá nhân, công nghệ và các trang web cung cấp tiện ích. Bạn có thể dễ dàng để thiết lập, tài liệu hướng dẫn sử dụng thân thiện. Nếu bạn muốn có một template blogspot đầy màu sắc, đây là template lý tưởng.

Template Xpress News cho blogspot

Một số tính năng của Template Xpress News:

  • Thiết kế Responsive hoàn toàn
  • Thanh News Ticker thông báo bài viết mới
  • Slider sử dụng jQuery
  • Thanh điều hướng và thanh menu xổ xuống trên top
  • Footer4 Cột
  • Giao diện 3 cột
  • Màu chủ đạo: Đen, trắng, xám
  • Trang 404 tùy chỉnh
  • Đa màu sắc
  • Các vị trí quảng cáo đã có sẵn
  • Dễ dàng cài đặt
  • Các widget có thể tùy chỉnh

Microsoft đã tung ra hàng loạt bản cập nhật cho các ứng dụng có sẵn trên hệ điều hành Windows 10 Mobile của mình. Các ứng dụng được cập nhật như: Outlook & Calendar, Store, Windows Maps, Windows Photos, MSN Weather, Movies & TV, Groove Music, Alarms & Clock...

Microsoft cập nhật hàng loạt ứng dụng cốt lõi

 Như thường lệ, không có bất kỳ nội dung thay đổi gì trong changelog của ứng dụng, vì vậy có thể hầu hết đều là sửa lỗi, tương tự như những lần cập nhật cách đây vài hôm.Tuy nhiên, với ứng dụng Store, mình thấy có thêm nhiều tùy chọn trong menu Hamburger như thêm View Account, Payment Options, Purchased, Redeem a code...và thay đổi Live Tiles của chính ứng dụng này, đã trượt như trên Windows 10 PC

 Những ứng dụng được cập nhật lần này đều là những ứng dụng Universal. Như vậy có thể thấy rằng, Microsoft đang dần chuyển trọng tâm phát triển sang Windows 10 Mobile, khi mà Windows 10 PC đã gần như hoàn thành và đã cung cấp cho các OEM để đưa ra thị trường.

 Các bạn nếu thấy những thay đổi trong các ứng dụng thì có thể cho mọi người biết với nhé. Mong chờ 1 tương lai tươi sáng cho Windows 10 Mobile! ^_^

Extra News là một template blogspot tốt cho các trang web tin tức hoặc blog cá nhân. Và template Extra News là một template phong cách tạp chí mới với thiết kế responsive và rất đẹp. Là sự lựa chọn hoàn hảo cho các tờ báo, tạp chí, biên tập, blog cá nhân vv ...

Template Blogspot - Extra News
Một số thông tin về Template Extra News cho Blogspot:
  • Thiết kế Responsive
  • Trang 404 tùy chỉnh
  • Carousel Lite
  • Slider sử dụng Jquery
  • Cài đặt dễ dàng
  • Thanh menu xổ xuống
  • Bài viết liên quan
  • Tự động resize ảnh thumbnails
  • Giao diện 3 cột
  • Thích hợp làm web về tin tức, hoặc blog cá nhân
  • Footer 4 cột
  • Hệ thống bình luận của Blogger

Đây là hướng dẫn tạo thanh menu ngang hiệu ứng 3D dành cho Blogspot, nhằm cung cấp cho các bạn đã chán thanh menu cũ mà lâu nay vẫn dùng, hay muốn tạo một sự khác biệt và nổi bật cho trang web của mình. Còn đợi gì nữa mà không thử thanh menu ngang 3D này đi nào!

Tạo thanh menu ngang hiệu ứng 3D cho blogspot

Hướng dẫn tạo thanh menu ngang hiệu ứng 3D cho Blogspot

- Đầu tiên, truy cập vào phần Bố cục (Layout) trong trang quản trị Blogger của bạn.
- Tiếp theo, hãy tìm đến vị trí bạn muốn đặt thanh menu này và click vào Thêm tiện ích (Add Gadget)
- Chọn HTML/JavaScript nhé, hãy copy đoạn code dưới này paste vào phần nội dung:
<div id="cssmenu" class="dropdown">
<ul>
   <li class="active"><a href="#" data-title="Home">Home</a></li>
   <li><a href="#" data-title="Product 1">Product 1</a></li>
<li><a href="#" data-title="Product 2">Product 2</a></li>
   <li><a href="#" data-title="Company">Company</a></li>
   <li><a href="#" data-title="Contact">Contact</a></li>
<li><a href="#" data-title="About">About</a></li>
<li><a href="#" data-title="Sitemap">Sitemap</a></li>
</ul>
</div>
<style>
@import url(http://fonts.googleapis.com/css?family=Raleway);
#cssmenu,
#cssmenu ul,
#cssmenu ul li,
#cssmenu ul li a,
#cssmenu #menu-button {
  margin: 0;
  padding: 0;
  border: 0;
  list-style: none;
  line-height: 1;
  display: block;
  position: relative;
  font-family:Trebuchet Ms;
  -webkit-box-sizing: border-box;
  -moz-box-sizing: border-box;
  box-sizing: border-box;
}
#cssmenu:after,
#cssmenu > ul:after {
  content: ".";
  display: block;
  clear: both;
  visibility: hidden;
  line-height: 0;
  height: 0;
}
#cssmenu #menu-button {
  display: none;
}
#cssmenu {
  width: auto;
  font-family: Raleway, sans-serif;
  line-height: 1;
}
#cssmenu > ul {
  background: #3db2e1;
}
#cssmenu > ul > li {
  float: left;
  -webkit-perspective: 1000px;
  -moz-perspective: 1000px;
  perspective: 1000px;
}
#cssmenu.align-center > ul {
  font-size: 0;
  text-align: center;
}
#cssmenu.align-center > ul > li {
  display: inline-block;
  float: none;
}
#cssmenu.align-right > ul > li {
  float: right;
}
#cssmenu > ul > li > a {
  padding: 16px 20px;
  font-size: 14px;
  color: #ffffff;
  letter-spacing: 1px;
  text-transform: uppercase;
  text-decoration: none;
  background: #3db2e1;
  -webkit-transition: all .3s;
  -moz-transition: all .3s;
  -o-transition: all .3s;
  transition: all .3s;
  -webkit-transform-origin: 50% 0;
  -moz-transform-origin: 50% 0;
  transform-origin: 50% 0;
  -webkit-transform-style: preserve-3d;
  -moz-transform-style: preserve-3d;
  transform-style: preserve-3d;
}
#cssmenu > ul > li.active > a {
  color: #dff2fa;
}
#cssmenu > ul > li:hover > a,
#cssmenu > ul > li > a:hover {
  color: #dff2fa;
  -webkit-transform: rotateX(90deg) translateY(-23px);
  -moz-transform: rotateX(90deg) translateY(-23px);
  transform: rotateX(90deg) translateY(-23px);
  -ms-transform: none;
}
#cssmenu > ul > li > a::before {
  position: absolute;
  top: 100%;
  left: 0;
  z-index: -1;
  -webkit-box-sizing: border-box;
  -moz-box-sizing: border-box;
  box-sizing: border-box;
  width: 100%;
  height: 100%;
  padding: 16px 20px;
  color: #dff2fa;
  background: #19799f;
  content: attr(data-title);
  -webkit-transition: background 0.3s;
  -moz-transition: background 0.3s;
  transition: background 0.3s;
  -webkit-transform: rotateX(-90deg);
  -moz-transform: rotateX(-90deg);
  transform: rotateX(-90deg);
  -webkit-transform-origin: 50% 0;
  -moz-transform-origin: 50% 0;
  transform-origin: 50% 0;
  -ms-transform: translateY(- -18px);
}
#cssmenu > ul > li:hover > a::before,
#cssmenu > ul > li > a:hover::before {
  background: #3db2e1;
}
#cssmenu.small-screen {
  width: 100%;
}
#cssmenu.small-screen > ul,
#cssmenu.small-screen.align-center > ul {
  width: 100%;
  text-align: left;
}
#cssmenu.small-screen > ul > li,
#cssmenu.small-screen.align-center {
  float: none;
  display: block;
  border-top: 1px solid rgba(100, 100, 100, 0.1);
}
#cssmenu.small-screen > ul > li:hover > a,
#cssmenu.small-screen > ul > li > a:hover {
  color: #dff2fa;
  -webkit-transform: none;
  -moz-transform: none;
  transform: none;
  -ms-transform: none;
}
#cssmenu.small-screen > ul > li > a::before {
  display: none;
}
#cssmenu.small-screen #menu-button {
  display: block;
  padding: 16px 20px;
  cursor: pointer;
  font-size: 14px;
  text-decoration: none;
  color: #ffffff;
  text-transform: uppercase;
  letter-spacing: 1px;
  background: #3db2e1;
}
#cssmenu.small-screen #menu-button:after {
  content: "";
  position: absolute;
  right: 20px;
  top: 17px;
  display: block;
  -webkit-box-sizing: content-box;
  -moz-box-sizing: content-box;
  box-sizing: content-box;
  border-top: 2px solid #ffffff;
  border-bottom: 2px solid #ffffff;
  width: 22px;
  height: 3px;
}
#cssmenu.small-screen #menu-button.menu-opened:after {
  border-top: 2px solid #dff2fa;
  border-bottom: 2px solid #dff2fa;
}
#cssmenu.small-screen #menu-button:before {
  content: "";
  position: absolute;
  right: 20px;
  top: 27px;
  display: block;
  width: 22px;
  height: 2px;
  background: #ffffff;
}
#cssmenu.small-screen #menu-button.menu-opened:before {
  background: #dff2fa;
}
</style>
 Trong đó, các bạn sẽ thay đổi các dấu thành đường dẫn đến các trang mà bạn muốn, và các dòng chữ màu này thành tiêu đề tương ứng với từng đường dẫn.
 Nếu các bạn biết nhiều về CSS, có thể tùy chỉnh thoải mái như màu thanh menu, màu khi rê chuột vào...

- Sau đó hãy lưu lại và tận hưởng, thế là bạn đã có thanh menu ngang hiệu ứng 3D cho trang blogspot của bạn rồi đấy ^_^

Chú ý: Nếu các bạn muốn có thanh menu xổ xuống hiệu ứng 3D, hay thay thế thanh menu cũ ở một template nào đó, bạn cần hiểu rõ về CSS để tùy chỉnh nhé. Ở đây mình không thể hướng dẫn rõ ở phần này được.

Author Name

Contact Form

Name

Email *

Message *

Powered by Blogger.